If you’re a guitar player looking to control your pedalboard or complete rig, understanding and utilizing MIDI messages can be highly beneficial. By learning how to use MIDI messages to control your guitar effects, amplifiers, switchers, loopers, and other devices, you can create a highly customized and efficient setup that meets your needs as a player.
MIDI is a straightforward and versatile protocol that enables communication between devices. To start using MIDI to control your equipment, it’s crucial to understand the basic principles of MIDI messages and how to use them. Keep in mind that each device may have its unique requirements, so it’s essential to read the manual for each piece of equipment.
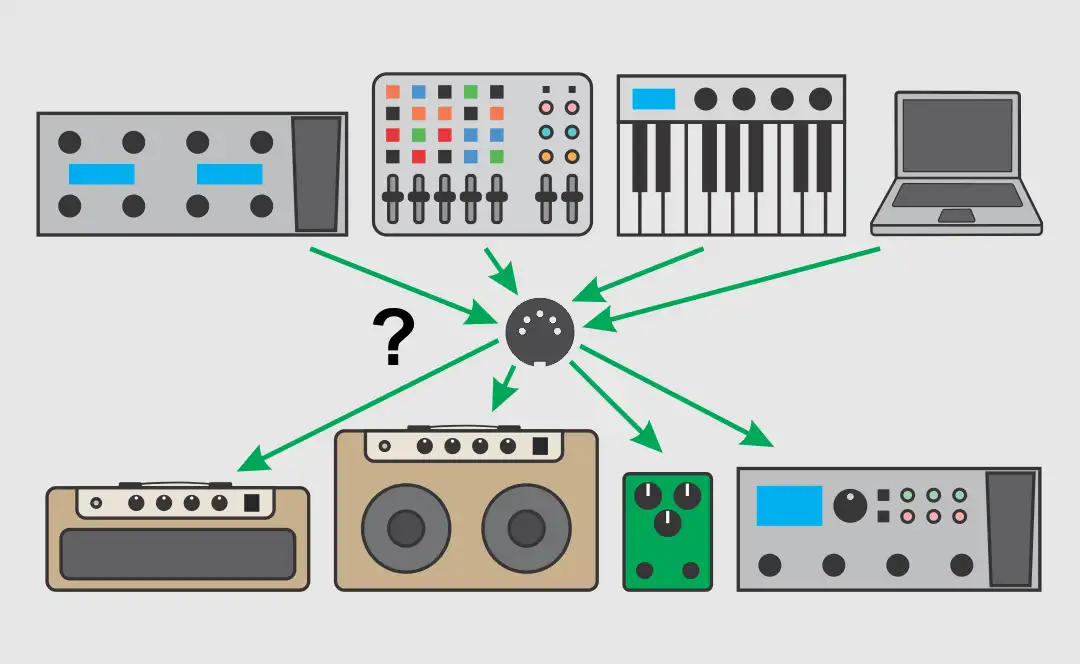
MIDI Wiring:

Input Devices:

Receiving /slave/ devices:

What is the difference between MIDI Out and MIDI Thru?
Not all MIDI devices have all three types of ports. Typically, they have MIDI Out and MIDI In ports. The MIDI Thru port retransmits the same MIDI message received at MIDI In. However, if your device lacks a MIDI Thru port, you can often use the MIDI Out port instead.
To control multiple music devices, musicians often use a single controller. Some devices have MIDI out or MIDI thru outputs, allowing you to chain the MIDI signals. But if you need more MIDI outputs, you must use a MIDI splitter. A MIDI splitter is a hardware device with one MIDI input and multiple MIDI outputs. Using a MIDI splitter, you can easily connect multiple MIDI devices to a single MIDI controller, making it easier to manage your setup.
Connecting your devices:


If the devices you want to control do not have MIDI out or MIDI thru outputs, you will need to use a MIDI splitter. This is a hardware device that has one MIDI In and several MIDI outputs.
MIDI channels:
MIDI communication relies on 16 channels to transmit messages between the controller and the receiving device. If the controller and the receiving device use the same MIDI channel, they can communicate seamlessly using the correct MIDI messages. However, if they use different channels, they won’t be able to “talk” to each other.
To control multiple devices, assigning them different MIDI channels is the solution. For instance, if you have two identical delays on your pedalboard, setting them to different MIDI channels will allow you to control them independently via your MIDI controller.
Some devices can receive MIDI messages on all 16 channels through its OMNI functionality. It’s useful when you have a small setup or are testing your device, but it’s better to use independent MIDI channels for more complex setups.
Program Change:
MIDI is a universal protocol with different types of messages used for specific purposes. One such type is Program Changes, which people commonly use to switch presets, modes, looper presets, amplifier channels, and more. There are 128 program changes available, numbered from 0 to 127. With 16 channels, you can access a total of 2048 MIDI program changes.
Control Change:
Control Changes are MIDI messages used to actively control variable parameters like volume, pan, effects from expression pedals, volume pedals, encoders, sliders, and more. Each message is numbered 0 to 127, including an extra bit for a VALUE, which distinguishes Control Change (CC) from Program Change. This value allows you to actively control parameters, such as volume. For instance, volume control commonly uses CC#7, where a value of 0 represents mute, 127 represents maximum volume, and all values in between represent different volume levels.
Control Changes allow keys or footswitches to actively represent pressing and releasing keys or tap tempo. When using CCs for key presses and releases, the receiving device divides the values into two groups. It considers values from 0 to 63 as key releases and values from 64 to 128 as key presses.
Control changes can actively control devices with Program Change-based presets, regardless of the value. MIDI widely employs specific classic and widely used controls for various purposes. For more information about them, visit the MIDI organization website.
Note On messages:
MIDI is not only used for guitar equipment but also for synthesizers with piano keys. Devices with piano keys actively utilize Note On messages. These messages, similar to control changes, consist of notes numbered 0 to 127, with values from 0 to 127 representing velocity. Velocity determines the intensity or force with which the note is played, with 127 being the loudest and 0 representing silence.
While guitarists typically do not use Note On messages, they hold significant importance for synthesizers and other keyboard-based instruments.
SysEx messages:
System Exclusive is a type of MIDI message that allows for communication and control of specific parameters and functions of MIDI devices beyond what is possible with standard MIDI messages.
SysEx messages are typically longer than other MIDI messages. Manufacturers define their own device-specific SysEx formats and parameters. They store or recall patches, update firmware, and control device operations. Specialized software may be needed to send/receive SysEx messages. As SysEx messages are complex and specific for each device, this topic does not cover them.
How to control your devices?
When it comes to controlling your MIDI devices, it’s important to read the MIDI implementation part of the manual first. There are two main ways to implement MIDI control: through a Learn function or through fixed MIDI messages.
The Learn function is commonly used by switchers, loopers, programmable selectors, and amplifier channel switchers to program their rig quickly and easily, especially for MIDI beginners. To use this feature, select a preset, press and hold the MIDI Learn button, and wait for an incoming MIDI message. These devices usually accept program change and control change messages. Note that in sequential MIDI messages, they only recognize the first message and save it to the preset you choose. To control multiple devices, reserve the first MIDI message for the device with the Learn function, then send MIDI messages for all other devices. Remember that different devices may use different MIDI channels.
The other method is fixed MIDI message control. Devices using this method usually have a whole section in their manuals with information on how to configure them via MIDI.
How to resolve MIDI issues?
When experiencing communication issues between two MIDI devices, the problem is likely due to either hardware or MIDI message issues.
A defective cable may cause hardware issues. To test hardware communication between devices, check if your device has an LED that blinks when it receives MIDI messages. You can use this as a MIDI tester. All N-audio MIDI Amp Cabinet Switchers including 8X7 Switcher, 4X4 Switcher, and Two Amps To Cabinet have this capability.
Message issues are more common. To troubleshoot them, start by checking the MIDI channels. Ensure that the channels are set to the same value for both the controller and receiving device. Then, check the required MIDI messages to confirm that they are being sent correctly.
Summary:
If you’re unsure about how to control your devices and you already have a controller, I highly recommend opening the user manuals for both devices. Start with something simple like switching presets, and then try improving your skills by adjusting some parameters. Once you’ve tested more commands provided by the manufacturer, controlling other devices will become much easier.
Useful links:
- I have written a post on designing MIDI schematics on the N-audio Blog page.
- The website of the MIDI Association – the source where you can find everything about MIDI.
- Also, check this Sparkfun MIDI tutorial.
- I have been using the MIDI-OX program for Windows for quite some time now. In my opinion, it is an excellent tool that can transform your sound card into a versatile MIDI tool.